Pages

3.25.2013

Hey Sexy Lady...

I did end up getting one day off today, though not because I was off jet-setting, but rather, because I we still too sick to head into the office. While I was kicking around the house today, I noticed this little gem in the mail:


It is a take-out menu for Panchito's, a new restaurant that has opened in the neighborhood. For better or worse, Roger's Park is one of the most diverse neighborhoods in the city, and as a result, the majority of the small business owners in the neighborhood are non-native English speakers. Many of the businesses circumvent the language barrier by offering no signage or advertising in English, so I guess you have to give Panchito's some credit for making an effort.

Still, this menu raises more questions than it answers: are the owners incredibly sexist, or just unaware of the meaning of saying that salad sandwiches are for "sexy ladies," and that the other sandwiches are for "hungry man?" As a woman, can I order something besides a salad sandwich? What is a salad sandwich anyway? Based on the descriptions, I think they just mean salads, but I can't really be sure.

Will I be checking out Panchito's? Probably not, but not just because of the unfortunate writing in their take-out menu -- the actual food just doesn't look that tempting. I'm thankful to them, however, for the laugh they gave me on this otherwise dull and icky day of illness.

3.23.2013

You Can't Win 'Em All...

I was supposed to be writing this post from a hotel room in Berlin, but instead, I am writing it in my own bed, in my own apartment, in humble Rogers's Park. Dad and I were supposed to be off on our latest father-daughter adventure, planned around an invitation from the Chicago Chamber of Commerce (of which Dad is a board member) to check out Air Berlin, a new air carrier in our city offering non-stop flights to, you guessed it, Berlin. To promote the new service, they had offered chamber members a sweet deal on airfare and accommodations, and we had jumped at the opportunity.

I was excited and looking forward to the chance to get away, especially to one of my favorite cities, but then on Wednesday I started to feel an ominous tickle in the back of my throat. Praying that it was allergies was to no avail, and by Thursday night, I felt even worse and was running a fever. However, I couldn't take off work yesterday and get myself to a doctor because I had to be in the office for a half-day, critically important work meeting with a number of surgeons who were in from out of town. All I could do was leave early and get myself to an urgent care center by the late afternoon.

The doctor I saw diagnosed me with a respiratory tract infection, and advised against flying, given my history of asthma, wheezing in the office, and below average oxygen levels. She gave me a prescription for antibiotics, but it was already too late. I was crushed.

We made the decision this morning not to go, and while I know in my heart of hearts that I am in no shape to fly, and it was the right decision, it doesn't make me any less disappointed. I love Berlin, and now I have no idea when I will have the opportunity to make it back again. Nobody ever said life was fair, but knowing that doesn't make it any easier.

3.18.2013

Pop It Like It's Hot...

For better or worse, I now share my home with a voracious snacker. I've actually never been much of a snacker; I usually consume snack foods in meal-size portions like half a bag of Doritos in one sitting, or a third of a package of Oreos at a time (though I'm doing better on that front than I did when I was in college). I never really snacked much growing up either, in fact, the after school snack enjoyed by so many kids was practically an unknown entity in our home, probably because we always ate dinner so early, usually around five o'clock.

However, my beloved is a constant grazer -- at times, I wonder if there is a black hole where his stomach should be. As a result, we keep more snack foods in the house than I ever did as a single person, and I find myself constantly on the hunt for new snack ideas that previously would have flown under my radar.

It was one of these ideas that Justin spotted when I finally managed to get him to look at my food-related Pinterest boards yesterday, to get his input on what he might be interested in making, now that he is doing more of the savory cooking around here. With laser-like focus, he honed in on a popcorn recipe I'd saved, that called for smoked paprika and Japanese snack crackers. You see, Justin already has a recipe in his repertoire for a popcorn and Japanese snack cracker blend, so I though he might like to try this variation just for the sake of trying something new. I was right.

Given our bountiful and well-stocked pantry, we actually had everything we needed to make this popcorn treat in our house already, despite the somewhat exotic ingredient list. Justin whipped up a batch today, almost the moment we walked in the door after work.

I wasn't even planning on eating it at all, since I'm sort of a popcorn traditionalist, and prefer to stick to butter and salt on mine. But as Justin rhapsodized over his new creation and proclaimed smoked paprika to be his new favorite spice, I decided to give it taste. I actually rather enjoyed the smoky/sweet combination that came from the paprika and a sprinkling of sugar. It was like a more complex version of kettle corn.

The rice crackers weren't doing it for me, but then again, I've never really been a fan. As it was, I just sort of picked around them, but in the future, if we were ever between visits to H-Mart and out of rice crackers, I would be more than happy to eat the popcorn with just salt, sugar, smoked paprika and butter. It may even turn me into snacker...


Smoky Popcorn
adapted from Food & Wine

1/4 c. vegetable oil
1/2 c. plus 2 tablespoons popping corn
1 teaspoon smoked hot Spanish paprika
1/2 tablespoon sugar
1/2 stick unsalted butter, melted and kept warm
1 tablespoon Japanese furikake mix*
2 c. Japanese mixed rice crackers
Kosher salt

1. In a large saucepan, combine the oil and popcorn, cover and cook over moderate heat until it starts to pop. Shake the pan and cook until the corn stops popping.
2. Transfer the hot popcorn to a large bowl. Sprinkle with the paprika and sugar and toss well. Drizzle with the butter and toss, adding the furikake and rice crackers. Season with salt, toss again and serve.

*Furikake is a seasoning mix that includes seaweed, sesame seeds, sugar, salt and dried bonito (dried fish flakes).

3.17.2013

Spill The Beans...

I'll admit it -- I've fallen off the wagon with regard to my plan to clean out the freezer. I made some progress, and got rid of some of the items that had been lingering in there a questionably long time, but for everything that I removed and used, I found something new to take its place, and the freezer remains as full as ever.

In spite of this failure of will, one meal planning stratagem that remains enmeshed in my arsenal is making an effort to select chains of recipes that utilize the same ingredients, so that I waste less food. For example, I had to buy rosemary for Friday's ditalini with chickpeas, so I started looking for other recipes that also utilize the herb to get the most out of my purchase. This led me to the rosemary lemon white bean dip I made yesterday while I was home alone, and to request herbed baked eggs for breakfast from Justin this morning.

Tonight, it was on to Creamy White Bean Soup with Chorizo, for which we had all the ingredients on hand except the dried beans and the Mexican-style chorizo, which we were able to find at one of the Hispanic grocery stores in our neighborhood. We actually forgot to start soaking the beans the night before (I very rarely used dried beans; though everyone asserts their textural superiority, I prefer the convenience of the canned variety), so it turned out to be a rather late dinner by the time we had finished waiting for them to soak.

Contrary to the recipe, I decided to sauté the sausage first and cook the vegetables in it, as it seemed like a shame to waste the extra flavor, but the chorizo proved to be exceptionally, almost shockingly lean. I ended up having to supplement the meager drippings with olive oil anyway.

The most arduous part of the recipe proved to be chopping all the vegetables and herbs, as my trusty immersion blender made the puréeing process relatively painless. It was still more effort than I would want to expend on getting dinner on getting dinner on the table on a week night, but it was a worthy weekend project.

The chorizo definitely made this dish; without it, the soup would have been fairly bland and uninteresting. In fact, discovering the quality of the chorizo at our local bodega may have been the most significant thing to come out of this recipe experiment. I'm sure you can look forward to seeing more fresh-chorizo dishes around here in the weeks and months to come!


Creamy White Bean and Chorizo Soup
adapted from Bon Appétit

1 pound dried cannellini or Great Northern beans (generous 2 cups)
8 cups water
3 tablespoons extra-virgin olive oil, divided
3 garlic cloves; 1 smashed, 2 chopped
1 large fresh rosemary sprig
1 bay leaf
1 large onion, coarsely chopped (about 2 cups)
1 large carrot, coarsely chopped (about 1 cup)
1 large celery stalk, coarsely chopped (about 3/4 cup)
2 1/2 teaspoons finely chopped fresh thyme, divided
4 c. chicken broth
1 pound fresh chorizo link sausages, casings removed
1/4 c. whipping cream

Place beans in heavy large saucepan. Add enough water to pan to cover beans by 4 inches. Let beans soak overnight at room temperature.

Drain and rinse beans; return to same saucepan. Add 8 cups water, 1 tablespoon oil, smashed garlic clove, rosemary, and bay leaf. Bring to boil. Reduce heat to medium-low, partially cover, and simmer until beans are just tender, 1 to 1 1/2 hours. Season to taste with salt.

Drain beans, reserving cooking liquid. Discard rosemary sprig and bay leaf.

Heat remaining 2 tablespoons oil in heavy large pot over medium heat. Add onion, carrot, and celery. Sprinkle with salt and pepper. Sauté until vegetables are beginning to soften, about 10 minutes. Add chopped garlic and 1 teaspoon thyme; sauté 2 minutes. Add 2 cups reserved bean cooking liquid, 4 cups chicken broth, and beans. Bring to boil; reduce heat to medium and simmer uncovered until vegetables are tender, about 25 minutes. Cool soup 10 minutes.

Meanwhile, sauté chorizo in heavy large skillet over medium-high heat until cooked through, breaking up lumps with back of spoon, about 5 minutes. Transfer chorizo to paper towels to drain.

Using slotted spoon, remove 1 1/2 cups bean mixture from soup; reserve. Working in batches, puree remaining soup in blender until smooth. Return puree to pot. Stir in reserved whole-bean mixture, remaining 1 1/2 teaspoons thyme, chorizo, and cream. Season with salt and pepper to taste, and serve.

3.16.2013

Dip It Low...

In the past, I have discussed how I have recently come to terms with being an extrovert, meaning that I draw energy from being around others, and do not enjoy being alone. This is why, though the rational half of my brain understands that it is good for Justin's career to pick up extra shifts on the weekends at a public library and keep up-to-date experience in that field on his résumé, I do not relish the fact that he takes the car with him and leaves me alone all day on the weekends.

To keep myself distracted and cut down on the feelings of despondency and boredom that accompany solitude for me, I try to stay as busy as possible on the unfortunate Saturdays when Justin is working,and I usually treat these days as an opportunity to scratch chores off my to-do list, catch up on the multitude of television shows that I TiVo but don't have time for during the week, and to tackle involved projects in the kitchen.

This week, however, our house was already relatively clean, we had leftovers we needed to eat, including enough leftover ice cream pie to make baking a wasteful option, and enough shows were on reruns that I had nothing to watch. I managed to talk Dad into having lunch with me as a pitstop on his way back to the burbs after picking up some papers downtown, but I was still desperate for something to keep my mind occupied.

Naturally, I turned once more to my Pinterest board, where I spotted a bean dip I could make using ingredients I already had on hand, including some of the rosemary leftover from last night's ditalini with chickpeas that wasn't going to stay good forever. Plus, given Justin's fondness for legumes, I figured I couldn't go wrong.

I ended up with only two complaints about this recipe: first, it was so quick and easy to make that it hardly helped me kill anytime at all, and second, it didn't make nearly enough dip. It was so good, that once Justin arrived home from work with the bag of pita chips I'd asked him to pick up, we polished off the dip much too quickly.

In the future, I would double this recipe if I were making it for just the two of us, and maybe even triple it if we were entertaining guests. (I've changed the recipe below to reflect this.) Lately, we've been making our quickly-becoming-legendary spicy Moroccan carrot dip whenever we have people over, but it will be nice to have something simpler in our arsenal, as that recipe is rather labor-intensive, even if people do love it.

I actually prefer this new bean dip, as the flavor profile is more in line with my palate. I'm glad we gave it a try, and I look forward to using it as a disposal mechanism for more leftover rosemary in our future.


Rosemary Lemon White Bean Dip
adapted from Serious Eats

2 15.5 oz cans cannellini beans, drained and rinsed
4 medium cloves garlic, peeled
1 tablespoon plus 1 teaspoon freshly squeezed lemon juice and 2 teaspoons finely grated lemon zest from 1 lemon
1/2 c. extra virgin olive oil
1 tablespoons plus 1 teaspoon finely minced fresh rosemary
Kosher salt and freshly ground black pepper

1. Place beans, garlic, and lemon juice in the workbowl of a food processor fitted with a steel blade. Pulse until beans are roughly chopped.
2. With motor running, slowly pour 1/2 cup of oil through feed tube. Process until mixture is smooth.
3. Transfer bean mixture to a small bowl. Stir in rosemary and lemon zest. Season with salt and pepper to taste. Serve immediately or store in an airtight container in the refrigerator for up to 3 days.

3.15.2013

Chickpeas: Neither Chick Nor Pea: Discuss...

In our house, I am solely responsible for planning our meals, as well as planning the grocery runs that make them possible. I sit down every Thursday or Friday and look at the store ads online to see what the best bargains are for the week. Then, I conduct a mental (and sometimes physical inventory of the fridge, and what ingredients need to be utilized in short order. Next, peruse my Pinterest boards to see what new recipes I could try that best combine items that are on sale with items we already have, and finally, I write down a list of what ingredients we need to buy.

Given that all this decision-making falls on me, it would be easy to abuse this power and impose my culinary vision on Justin however I see fit. I could easily eliminate ingredients from our diet that don't appeal to me, but for the most part, I strive to make my kitchen dictatorship a benevolent one.

This is why I decided to include a variation on pasta e ceci, or pasta with chickpeas, a classic Italian pairing, in this week's meal rotation. I've never been much of a fan of the legume, in fact, I eschewed eating hummus at all until the past couple years or so, but my beloved loves chickpeas almost as much as he loves me.

I think he also loved this recipe because he was able to do almost all the chopping in the food processor, which is a huge time-saver compared to the usual recipes I request him to make that require lots of meticulous chopping my hand. (It was truly a stroke of tremendous foresight to have signed us up for that knife skills class back in the early days of our relationship!) 

It did have an added step, in the form of creating a garlic and rosemary-infused olive oil to drizzle over the top of the finished dish, but we felt that the effort-to-result ration was skewed in its favor -- it really brought something special to the dish, and rescued it from being bland. As for me, I felt that the starch-on-starch of the beans with the pasta was a little much for me, though the chickpeas maintained their texture surprisingly well. For a non-chickpea lover, this wasn't actually a good thing, but the dish benefited from having a bit of textural contrast, even if I was left longing for some meat, or nuts, or really anything besides the garbanzos.

Still, Justin really liked this dish, so I'll be sure to incorporate it into our future meal planning. After all, I'm always on the lookout for something to do with the giant seven pound cans of chickpeas he buys from a nearby ethnic grocery store. A girl can only eat so much hummus, and even if I'm not super enthusiastic about this dish, it could be a welcome change of pace...


Ditalini with Chickpeas and and Garlic-Rosemary Oil
adapted from Bon Appétit

1 medium onion, quartered
1 medium carrot, peeled, cut into 1-inch pieces
1 celery stalk, cut into 1-inch pieces
6 garlic cloves, 4 whole, 2 chopped
1/2 cup flat-leaf parsley leaves
1/4 teaspoon crushed red pepper flakes
1/2 cup olive oil, divided
Kosher salt
2 tablespoons tomato paste
2 15-ounce cans chickpeas, rinsed
1 pound ditalini or elbow macaroni
1 tablespoon chopped fresh rosemary

1. Pulse onion, carrot, celery, whole garlic cloves, parsley, and red pepper flakes in a food processor until finely chopped; transfer to a small bowl and set aside. Wipe out food processor bowl and set aside.
2. Heat 1/4 cup oil in a large heavy pot over medium heat; add reserved vegetable mixture, season with salt, and cook, stirring often, until golden, 8-10 minutes. Stir tomato paste and 1 cup water in a small bowl to combine; add to pot. Cook, scraping up any browned bits from bottom of pot. Bring to a boil, reduce heat, and simmer until liquid has almost evaporated, 5-8 minutes.
3. Add chickpeas and 2 cups water to pot and simmer for 15 minutes to let flavors meld. Transfer 1 cup chickpea mixture to food processor; purée until smooth, then stir back into sauce to thicken.
4. Meanwhile, cook pasta in a large pot of boiling salted water, stirring occasionally, until al dente. Drain pasta, reserving 1 1/2 cups pasta cooking liquid.
5. Add pasta and 1/2 cup pasta cooking liquid to sauce and stir to coat. Increase heat to medium and continue stirring, adding more pasta cooking liquid as needed, until sauce coats pasta.
6. Heat remaining 1/4 cup oil in a small sauce­pan over medium-low heat; add chopped garlic and rosemary and cook until sizzling stops, about 1 minute. Divide pasta among bowls and drizzle with garlic-rosemary oil.

3.14.2013

Keep Your Fork, There's Pie...

Heading into March, I didn't really have much on my agenda, besides planning for Pi Day, on 3.14. Last year, I finally managed to make a real pie to celebrate the occasion, after years of good intentions, and I wanted repeat the feat this year. I looked through all the pies on my Pinterest board, narrowed down the options to a few serious contenders, and then proceeded to get really, really busy.

Between work, a deadline for the next edition of "Dining Due Diligence," and my attempts at maintaining some semblance of a social life, the time has practically flown by lately. I knew I was going to have to scale back my plans for Pi Day, and when I took a look around my kitchen last week, I knew just how to do it.

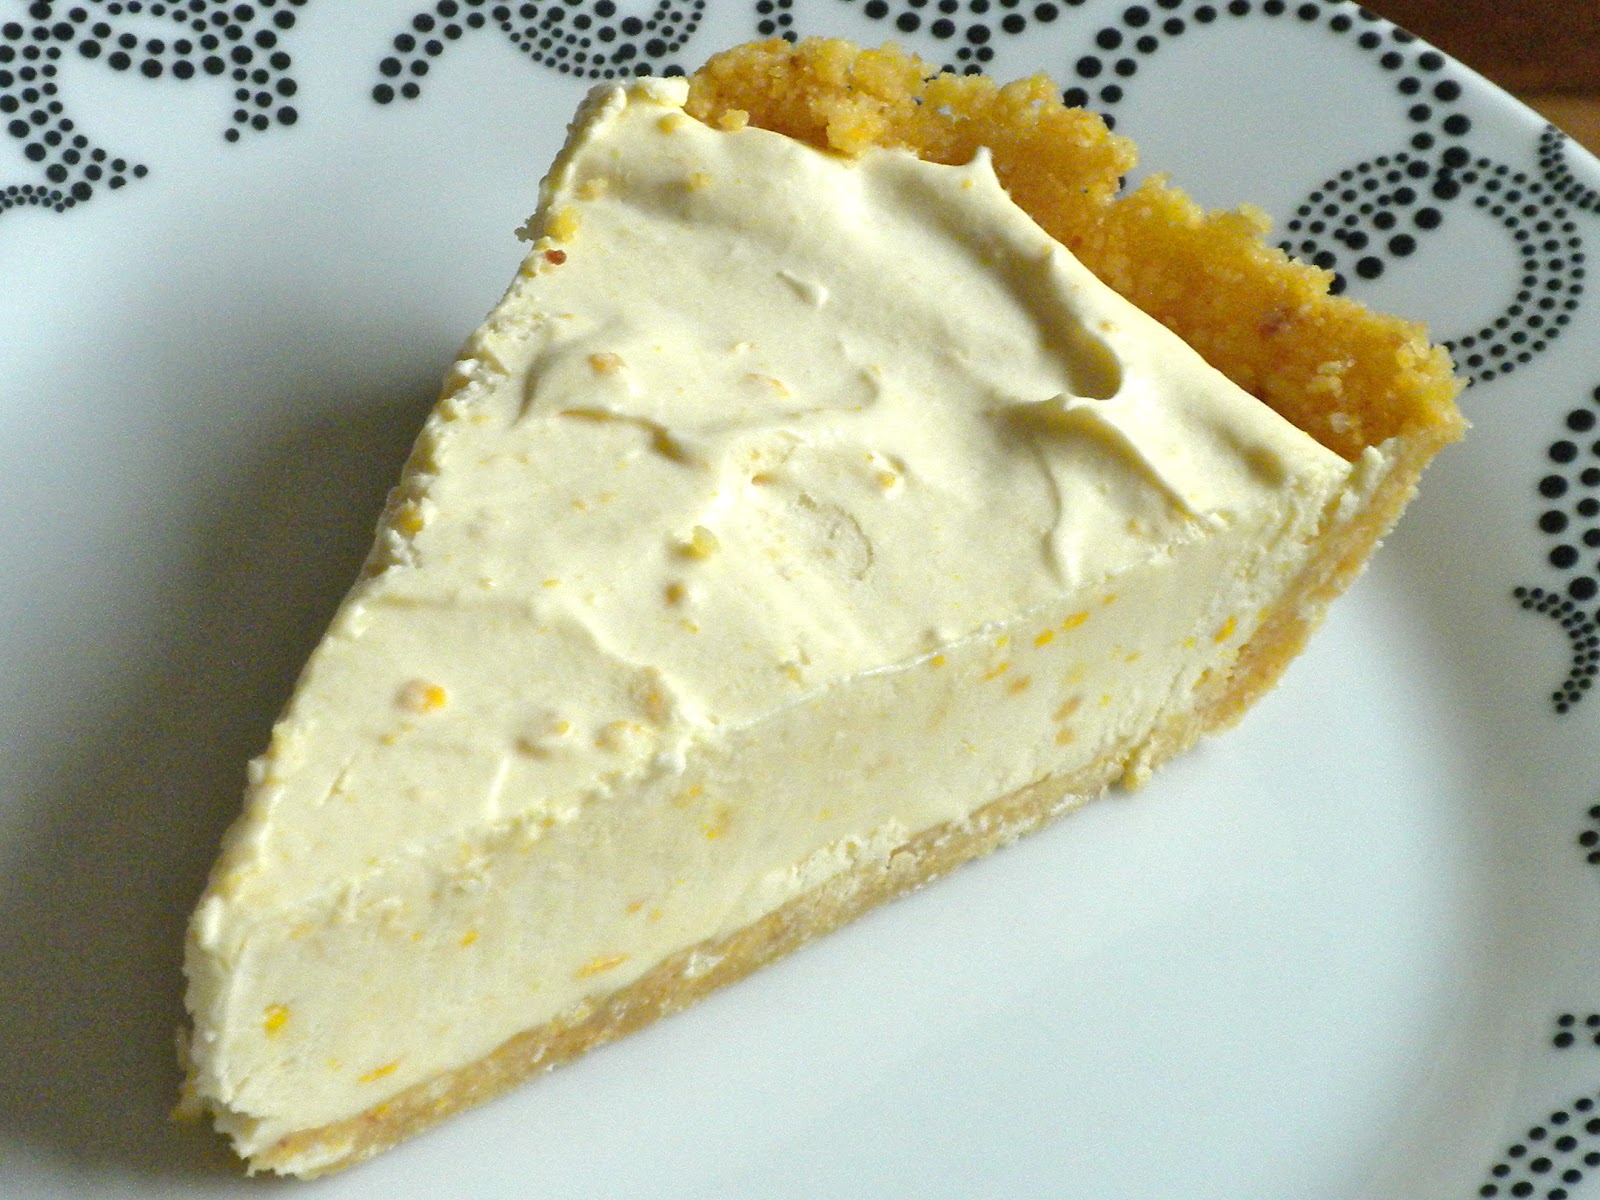
Sitting in my cookie jar were the leftover corn cookies I had baked from the Momofuku Milk Bar cookbook, and Christina Tosi, in her modular approach to baking, had included instructions for turning the cookies into a crust for her cereal milk ice cream pie. Cereal milk is a Momofuku Milk Bar signature, and they turn it into a range of desserts from panna cotta, to popsicles, to ice cream, in addition to selling it by itself, either to drink on its own, or as a coffee additive. It's basically exactly what it sounds like: milk that has been infused with cereal, like what is left at the bottom of your breakfast bowl in the morning, with a bit of extra sugar added.

I was a little skeptical about the whole cereal milk concept, but thought it might be worth trying, due to its incredible popularity. When I described the concept to Justin, he was similarly cool on the topic, but I won him over when I told him that we'd have to buy Captain Crunch for the project, and that there would be leftovers for him to eat.

The modular nature of the recipe made it perfect for my time-crunched lifestyle of late: I was able to grind up the cookies for the crust, press it into a pan, and freeze it while the cookies were still fresh, and I outsourced the cereal milk production to Justin earlier this week. Basically, all it involved was crushing some Captain Crunch, pouring milk over it, steeping it for 20 minutes, and then straining it and adding sugar.

The "ice cream" base was the most complicated step, as it required making s custard, but it was allegedly designed to freeze well without first being churned, because the recipe dated back to a time in Tosi's career when her pastry kitchen was too small for an ice cream machine. Any streamlining that results in fewer dishes to wash is fine with me.


Ultimately, I was forced to question Tosi's wisdom in not churning the ice cream base. Though the cereal milk had a surprisingly pleasant taste, the texture of the ice cream was extremely icy and almost crunchy. I honestly can't imagine a professional chef serving that in a restaurant or a bakery. Plus, though the cereal milk was mild and surprisingly good given what it was, I felt like it needed something, like some berries or fruit spooned on top for garnish, because it was a little bland on its own.

The crust, however, was the highlight of the pie by far. It was truly excellent: sweet, corny, and with a nice hint of salt for balance. I suspect it would be great paired with a variety of other pie fillings, like a cream or custard pie, or something in the blueberry family. I'm definitely going to keep this crust in mind, not only as a potential use for leftover corn cookies, but also as a justification to bake a batch of the cookies in the first place.

It's kind of funny that cookies turned out to be the star of Pi Day, but I'm glad to have a new pie crust for my repertoire, and to have been able to delve further into the Momofuku Milk Bar book, even if the cereal milk ice cream filling was kind of a bust.


Corn Cookie Pie Crust
adapted from Christina Tosi

3 corn cookies
2 tablespoons melted butter

1. Put the corn cookies in the food processor and pulse it on and off until the cookies are crumbled into bright yellow sand.
2. In a bowl, knead the butter and ground cookie mixture by hand until it is moist enough to form a ball. If it is not moist enough to do so, melt an additional tablespoon of butter and knead it in. 
3. Using your fingers and the palms of your hands, press the corn cookie crust firmly a 9-inch pie plate. Make sure the bottom and the walls of the pie plate are evenly covered. Wrapped in plastic, the crust can be frozen for up to two weeks.